|
|
Photographing for RealismText & Photos by the Webmaster |
A few camera basics...Two basic camera types are in common use today; traditional film cameras and digital electronic cameras. Being an admitted techno-freak, I was quick to jump on the digital bandwagon in the late 90s. But I also still have several film cameras that I use from time to time. There are obvious differences between the two, but most of the techniques discussed in this article are applicable to either type. My personal preference these days is digital because there's no film/processing cost involved, and you can see your results instantly. Digital images are also a snap to use on the Internet or to send via e-mail. About the only time I use a film camera is when I'm working on a project for publication that requires extremely high image quality. But as digital cameras get better and better, these instances have become quite rare. Features to look for...Photographing models falls generally into the macro or tabletop photography category, and the camera you'll be using should have macro or close-focus capability. Most contemporary digital cameras, even inexpensive ones, have macro capability, which means that you can place the camera rather close to the subject and still get a photo that's in focus. Check your camera's manual for specific details on this feature. Most common film cameras don't have this standard feature, and require additional lenses and/or accessories to allow for macro photography. Again, check the manual to be sure. If your camera doesn't have macro capability, there is a way around the problem. First you'll need to determine just how close you can get the camera to the model and still have the photo remain in focus. This will vary from camera to camera, but your manual should tell you the minimum camera-to-subject distance. Or you can just experiment. Several factors in addition to the camera's minimum focus range can affect your results; we'll discuss those a little later in this article. Once you've determined how close you can get, you can photograph the model and then crop the photos to remove unwanted backgrounds and make the model appear closer than it actually was in the original photo.
Depth-of-fieldDepth-of-field refers to how much of the photo is in sharp focus. This is affected primarily by the size of the lens opening (aperture). All other factors being the same, i.e., amount of light and camera-to-subject distance, the smaller the lens opening, thr greater the depth of field will be. Compare the two examples below. The photo on the left was taken using a large lens opening. Notice how the front of the car is out of focus. On the right, the entire car is in focus, because this photo was taken using a small lens opening.
All well and good, you say, except that it's the middle of January and there's a foot of snow on the ground. Then it's time to shoot your photos indoors. Most cameras these days have built in flash, which helps a great deal. Except that in many cases, you'll have to forget setting the aperture manually and revert back to the automatic settings. The advantage here is that in most cases, using a flash will give you acceptable depth-of-field. Or you can manually set the camera for a small aperture, mount it on a tripod, and use whatever light source you have available. This is a bit more tricky, because our old nemesis "camera shake" comes back to haunt us. To get around that you'll need to either use a remote shutter release (normally available only on higher-end equipment) or use the camera's self-timer feature (if it is so equipped). Here are a couple of examples, on the left, natural room light, and on the right, using the camera's built-in flash.
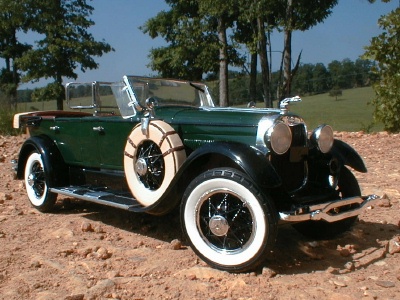
Okay, so we've gotten macro photography and depth-of-field figured out. What's next? Camera angles...Aside from the technical aspects of getting a properly focused and exposed photo, one of the most important things that affects the realism of a photo is camera angle. Consider photos you've seen of full-sized vehicles. In the vast majority of cases, these are taken by someone standing on the ground holding a camera at eye level. So in photographing a model for realistic results, you need to imitate this as much as possible. Two different camera angles are shown below.
Of course getting low photo angles may involve a bit of acrobatics. I've gotten some pretty strange looks from neighbors while lying flat on my stomach with the camera on the ground photographing models. But the results are worthwhile; some of my favorites have been shot this way. With the tips we've already discussed (and cooperative weather) you can shoot some very realistic outdoor photos of your models. Here are a few examples:
|